Walk-In Tunnel Greenhouse Guide: Venting, Setup, Seasons
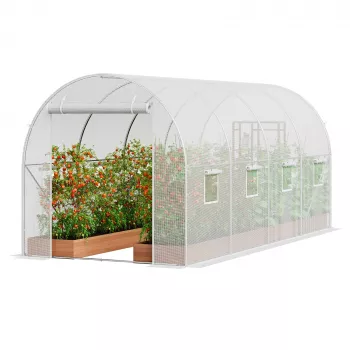
Walk-In Tunnel Greenhouse: Season Extension, Protection, and Everyday Growing
A walk-in tunnel greenhouse (often called a hoop house or tunnel) creates a sheltered growing space that helps stabilize temperature, reduce wind stress, and protect plants from light frosts and heavy rain. With enough height to stand and move inside, it’s also easier to water, trellis, prune, and harvest—making it a practical option for backyard gardens and small homesteads.
What a walk-in tunnel greenhouse changes in a home garden
A tunnel greenhouse doesn’t just add warmth—it changes how predictable your garden feels week to week. By moderating the worst swings in weather, it becomes a “middle zone” between open-air beds and an insulated, heated greenhouse.
- Extends the growing season by buffering temperature swings and blocking cold winds.
- Improves plant health by reducing rain splash on leaves and lowering foliar disease pressure when ventilated properly.
- Creates a controlled zone for seedlings, heat-loving crops, and overwintering hardy plants.
- Makes routine tasks simpler: walking access, shelving space, and room for trellises or tall crops.
- Supports more consistent results when outdoor weather is unpredictable.
For growers who want a ready-to-use structure with walk-in access, the Walk-In Tunnel Greenhouse is a straightforward way to add protected growing space without committing to a rigid-panel build.
Best uses by season
One of the biggest advantages of a tunnel is flexibility. The same structure can serve as a nursery, a storm shield, and a late-season production space—sometimes all in the same year.
- Late winter/early spring: start seedlings, harden off transplants, and grow cool-season greens under cover.
- Spring: protect young plants from cold nights and wind; speed early growth for tomatoes, peppers, and cucumbers.
- Summer: use shade cloth and open doors/vents to prevent overheating; keep tender plants protected from storms.
- Fall: keep producing warm-season crops longer and start a second round of greens and herbs.
- Winter (mild climates): grow cold-hardy crops with added row cover; store tools or protect dormant potted plants from harsh weather.
For deeper, research-based guidance on seasonal management, these resources are helpful: University of Minnesota Extension and Penn State Extension.
Sizing and layout: picking a tunnel that’s easy to use
The best size is the one that fits how you actually garden. A tunnel that’s roomy enough to work in—without becoming a daily obstacle—tends to get used more consistently.
- Measure the footprint with door swing and walking clearance in mind; allow room around the outside for anchoring and maintenance.
- Plan bed layout first: one center path with two side beds is often simplest for walk-in tunnels.
- Choose enough height for comfortable standing and for trellised crops (tomatoes, pole beans, cucumbers).
- If using shelves or seedling tables, reserve a dedicated zone so airflow and access remain easy.
- Keep irrigation access in mind: hose route, drip line manifold location, and where runoff will go.
Practical layout tip: keep your path wide enough for a bucket or garden cart, and avoid squeezing beds right up to the sidewalls—plants that touch wet plastic are more likely to spot, rot, or invite pests.
Materials, cover options, and airflow
A tunnel greenhouse succeeds or fails on two fundamentals: structure strength and ventilation. Warmth is great, but trapped heat and humidity can become the fastest route to stress and disease.
Setup essentials: site choice, anchoring, and stability
Keeping the space clean also matters. A lightweight stick vac can be handy for tidying potting spills, dried soil, and greenhouse corners—options like the 20Kpa Cordless Stick Vacuum Cleaner for Hard Floor, Carpet & Pet Hair or the Cordless Vacuum Cleaner, 235W Brushless Motor, 40Min Runtime can help keep walkways and work zones manageable.
Quick comparison: tunnel greenhouse vs other options
Common season-extension structures at a glance
| Structure | Typical best for | Pros | Trade-offs |
|---|---|---|---|
| Walk-in tunnel greenhouse | Season extension, protected growing, trellised crops | Walk-in access, good growing volume, adaptable layout | Needs strong anchoring; can overheat without venting |
| Cold frame | Seedling starts and early greens | Very warm for its size, simple, compact | Limited height and access; not for tall crops |
| Row cover / low tunnel | Frost protection and insect exclusion | Low cost, quick setup, flexible | Not walk-in; limited airflow control and access |
| Rigid-panel greenhouse | High control, year-round projects | Durable, often better insulation | Higher cost; more complex build and permitting considerations |
Care and maintenance for longer cover life
A ready-to-go option: Walk-In Tunnel Greenhouse
A walk-in tunnel is most rewarding when it becomes part of the everyday routine: morning venting, quick checks for moisture, and easy harvesting without battling wind or rain. The Walk-In Tunnel Greenhouse provides a dedicated walk-in growing space for seedlings, greens, and warm-season crops, and it pairs well with simple upgrades like drip irrigation, trellis netting, and shade cloth in hot weather.
FAQ
How warm does a tunnel greenhouse stay at night?
It depends on outside temperature, wind, cloud cover, and how well the cover is sealed and tensioned. Adding an inner row cover and a bit of thermal mass (like water-filled jugs) can help, but an unheated tunnel won’t hold heat like a heated, insulated greenhouse.
How do plants avoid overheating inside a tunnel?
Ventilation is the first line of defense: open doors/ends early and keep air moving through the space. Shade cloth during hot spells and watering earlier in the day also help, since stagnant hot, humid air can increase both stress and disease risk.
Can a tunnel greenhouse handle wind and snow?
Stability comes from good siting, strong anchoring, and keeping the cover tight to reduce flapping. Brush off heavy snow buildup promptly and inspect anchors and fasteners after storms, since performance varies by design and local extremes.









Leave a comment