DIY Wooden Book Nook Kit: Build a Mini House Scene
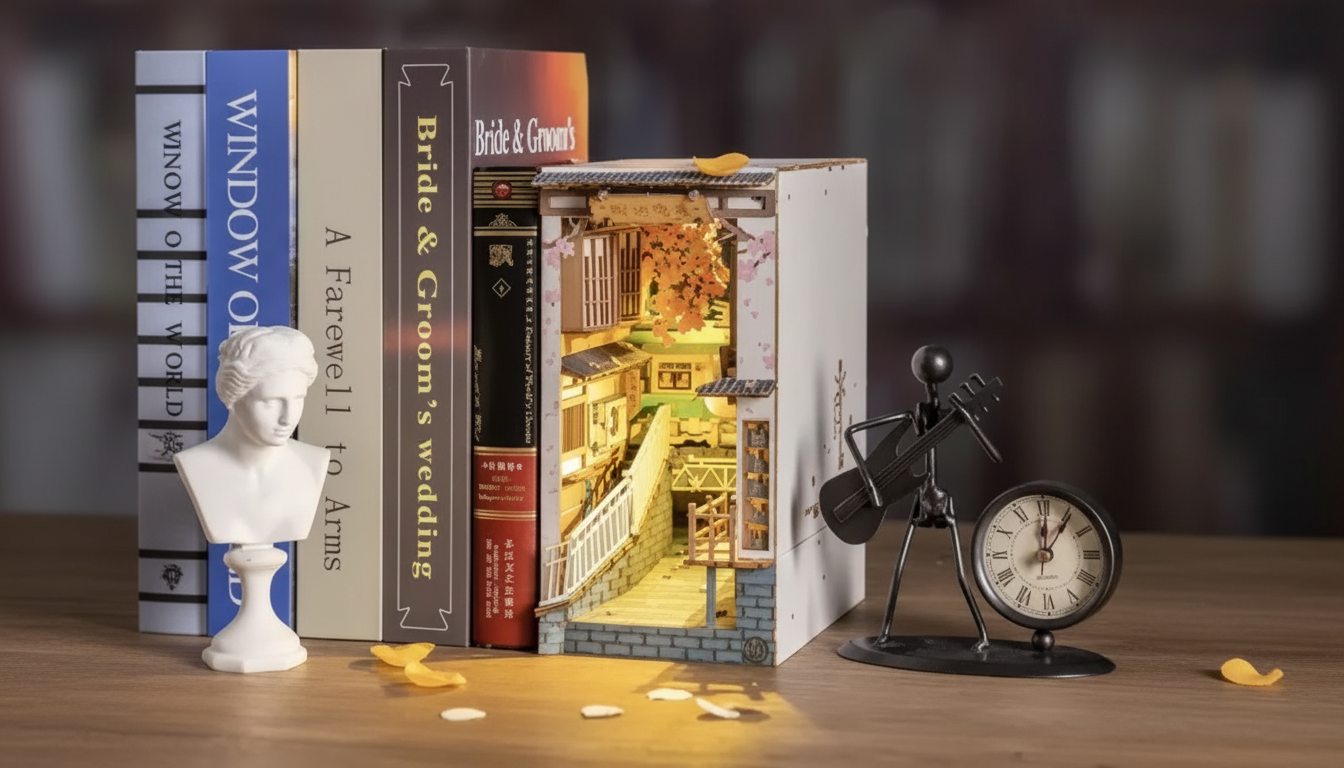
DIY Wooden Miniature House Book Nook Kit: Build a Tiny Scene Between Your Books
A wooden book nook kit turns an ordinary shelf gap into a miniature room or street scene with real depth, warm textures, and tiny details that reward a close look. A project like the DIY Wooden Miniature House Book Nook Kit is equal parts relaxing craft and satisfying model build: you’ll sort pieces, test-fit, glue, and finish until the scene looks like it’s always belonged among your favorite titles. Below is what to expect, a typical build flow, the basic tools that make everything smoother, and a few customization ideas that make the finished nook feel personal.
What a book nook is and why wooden kits feel so satisfying
A book nook is a small diorama designed to sit between books like a living “window” on the shelf. Many include lighting, which adds shadow, depth, and that cozy “peek inside” effect as you walk past.
Wooden kits are especially satisfying because the pieces have crisp edges and a sturdier feel than paper-based builds. You can often feel the structure lock together as the frame squares up, and the layered scenery reads clearly once the background and mid-ground go in.
The process is tactile and methodical: sorting parts, dry-fitting, gluing, and doing a final tidy-up pass. It also makes an easy-to-love gift because the finished piece works as decor even for someone who doesn’t normally display miniatures.
Quick snapshot: what to expect from the DIY Wooden Miniature House Book Nook Kit
Most wooden book nook kits are designed as shelf inserts that create a “house” scene with layered depth. The best experience comes from working slowly—test-fit first, glue second—and keeping parts organized so small items don’t vanish between sessions.
Expect plenty of small components. Patience and steady hands matter more than advanced crafting experience, and a dedicated work surface (a tray or cutting mat) helps you pause and resume without losing momentum.
Practical build checklist
| Item | Why it helps | Required |
|---|---|---|
| Tweezers | Place small decor parts cleanly and accurately | Recommended |
| Precision craft knife | Trim tabs, remove tiny burrs, clean edges | Recommended |
| Wood glue (quick tack) | Strong bonds for structural wooden joints | Yes |
| Clear-dry craft glue | Neater finish for paper/film/details | Recommended |
| Fine sandpaper (400–800 grit) | Smooth edges for tighter fits and cleaner paint | Optional |
| Clips or rubber bands | Hold walls/frames square while glue cures | Optional |
Unboxing and prep: set up for a smoother build
A little prep at the start saves a lot of frustration later. Sort pieces by type—walls, floors, trim, decor—and place them in small cups or trays. If the kit has numbered sheets, keep the sheets intact until you’re ready to pop pieces out.
Before committing to glue, dry-fit the key structural parts. This gives you an early sense of the sequence and shows where joints are tight. If a laser-cut tab resists fitting, lightly sand the edge rather than forcing it; forcing can split thin pieces or throw off alignment down the line.
If your kit includes clear panels, keep the protective film on until the moment you install them to prevent scratches and fingerprints. And if you’re using stronger adhesives or paints, set up in a well-ventilated area—basic indoor air guidance from the U.S. EPA is a helpful reference for keeping your workspace comfortable.
Step-by-step build flow (typical for wooden book nook kits)
1) Base and frame
Start with the floor/base, then add the side walls and main frame. This is where careful alignment pays off—square corners now prevent the “twist” that can make later layers fight you. Clips or rubber bands can hold walls true while glue grabs.
2) Background layers
3) Interior structure
4) Detail pass
5) Front and finish
6) Lighting (if included)
Customization ideas that make it look truly one-of-a-kind
Display, care, and long-term durability
For dust, use a soft brush or compressed air on low. Avoid wet cleaning around paper elements and printed details. If you want a quick way to keep the surrounding shelf clean, a small cordless vacuum can help—options like the Cordless Vacuum Cleaner, 235W Brushless Motor, 40Min Runtime, 6-in-1 Lightweight for Household Cleaning or the 20Kpa Cordless Stick Vacuum Cleaner for Hard Floor, Carpet & Pet Hair, Rose Red are convenient for quick shelf-area touch-ups (use gentle settings near delicate decor).
Who it’s best for (and when to pick a simpler kit)
Choose a simpler kit if very small parts are frustrating or if the project needs to be finished in one short session. And for younger crafters, adult supervision is important due to sharp tools, adhesives, and small components—general safety guidance from the U.S. Consumer Product Safety Commission is a smart baseline for managing small parts and tools at home.
FAQ
How long does a wooden book nook kit take to finish?
Most builders can expect several hours split across multiple sessions—often a weekend project—depending on experience, how intricate the details are, and how much drying/curing time you allow. Painting and customization can add extra sessions, so it’s best to plan for a relaxed pace.
What glue works best for a wooden book nook build?
A quick-tack wood glue is ideal for the main wooden structure, while a clear-dry craft glue is helpful for smaller detail parts and mixed materials. Apply glue in thin amounts and wipe any squeeze-out promptly for a cleaner finish.
Is this suitable for kids or complete beginners?
It’s beginner-friendly for anyone with patience and steady hands, but the small parts, sharp tools, and adhesives make it better for teens and adults. Younger kids can participate with close adult supervision and age-appropriate tool handling.










Leave a comment